The Complete Renter’s Guide to Moving Out
Moving out of a rental is more than just packing boxes and returning keys. It’s a sequence of steps that, done right, gets your full security deposit back, avoids disputes with your landlord, and sets up your actual move day to go smoothly. Done wrong, it costs you hundreds (or thousands) in lost deposits and avoidable fees.
Most move-out checklists are written by landlords or property managers — focused on what they want from you. This one is written by professional movers who help renters move out every day. We’ll cover the admin and cleaning steps, but also the part no one else talks about: how to protect your deposit during the physical move itself — preventing wall dings, floor scratches, and door frame damage that can cost you deductions before you’ve even left the building.
Quick Overview: Your Move-Out Timeline
6–8 weeks out: Give notice, review your lease, start decluttering
4 weeks out: Book movers, start packing, schedule building access
2 weeks out: Handle repairs, deep clean room by room, coordinate utilities
1 week out: Final cleaning, photograph everything, confirm move-out inspection
Moving day: Protect the unit during the move, final walkthrough, return keys
Step 1: Review Your Lease & Give Proper Notice
Before anything else, pull out your lease agreement and read the move-out provisions. This is where most deposit disputes start — not from damage, but from missed deadlines and procedural missteps.
✔ Check your required notice period. Most leases require 30 days written notice, but yours may require 60 or 90. Missing this deadline can cost you a month’s rent or your deposit.
✔ Send written notice — not just a text. Even if you have a good relationship with your landlord, send a formal written notice (email is usually fine, certified mail is safest). Include your move-out date, forwarding address, and a request to schedule a walkthrough inspection.
✔ Review your move-in condition report. If you documented the apartment’s condition when you moved in (photos, checklist, or signed condition statement), pull it out now. This is your baseline — anything that was already damaged when you arrived can’t be charged to you.
✔ Note any special lease requirements. Some leases require professional carpet cleaning, repainting to the original color, or specific appliance maintenance before you leave. Know what your lease says before you spend money on things that aren’t required — or skip things that are.
Step 2: Handle Repairs Before Moving Day
Small repairs you handle yourself cost a few dollars. The same repairs charged by your landlord and deducted from your deposit can cost ten times that. Address these while you still have access:
✔ Patch nail holes and small wall damage. Spackle, a putty knife, and a damp cloth can fix most small holes in minutes. If you painted during your lease, check whether your lease requires you to repaint to the original color.
✔ Fix anything you broke or damaged. Loose cabinet handles, cracked outlet covers, missing curtain rod brackets — these are cheap fixes that landlords charge premium prices for.
✔ Submit maintenance requests for landlord-responsible items. If there are issues that are the landlord’s responsibility (plumbing, appliance problems, electrical), submit a written request now. This creates a paper trail showing the issue existed during your tenancy and wasn’t caused by your move-out.
✔ Replace burned-out lightbulbs and dead batteries. Replace all lightbulbs and swap batteries in smoke and carbon monoxide detectors. These are easy deductions landlords will make if you skip them.
Normal wear and tear vs. damage: Faded paint, minor scuffs from everyday use, small nail holes from hanging pictures, and light carpet wear are generally considered normal wear and tear — your landlord can’t deduct for these. Large holes, stains, burns, broken fixtures, and pet damage are typically considered tenant-caused and can be deducted. When in doubt, fix it yourself — it’s almost always cheaper.
Step 3: Deep Clean — Room by Room
Cleaning is the #1 reason deposits get reduced. The goal is to return the apartment to the condition it was in when you moved in (minus normal wear). Work room by room so nothing gets missed:
Kitchen
✔ Clean inside and outside of oven, stovetop, range hood, and microwave
✔ Empty, defrost, and wipe down refrigerator and freezer (inside and outside)
✔ Scrub countertops, backsplash, and sink (including under the sink)
✔ Wipe inside all cabinets and drawers — crumbs and residue count
✔ Run the dishwasher empty with a cleaning cycle (if applicable)
✔ Run the garbage disposal with ice and lemon or a disposal cleaner
Bathroom(s)
✔ Scrub toilet (inside, outside, base, behind)
✔ Clean shower/tub — remove soap scum, mildew, and any caulk discoloration
✔ Wipe down sink, vanity, mirror, and medicine cabinet
✔ Clean exhaust fan cover (remove and wipe or vacuum)
✔ Check for and clear slow drains
All Rooms
✔ Wipe down walls, baseboards, door frames, and light switches
✔ Clean all windows (inside) and wipe blinds blade by blade
✔ Vacuum carpets thoroughly — consider renting a carpet cleaner for stains
✔ Sweep and mop hard floors
✔ Clean inside all closets — shelves, rods, and floors
✔ Dust and wipe ceiling fan blades and light fixtures
✔ Clean AC/heating vents and replace filters if applicable
Outdoor Areas (If Applicable)
✔ Remove all items from balcony, patio, deck, or yard
✔ Sweep or clean outdoor areas
✔ Remove any storage items from basement, attic, or assigned storage areas
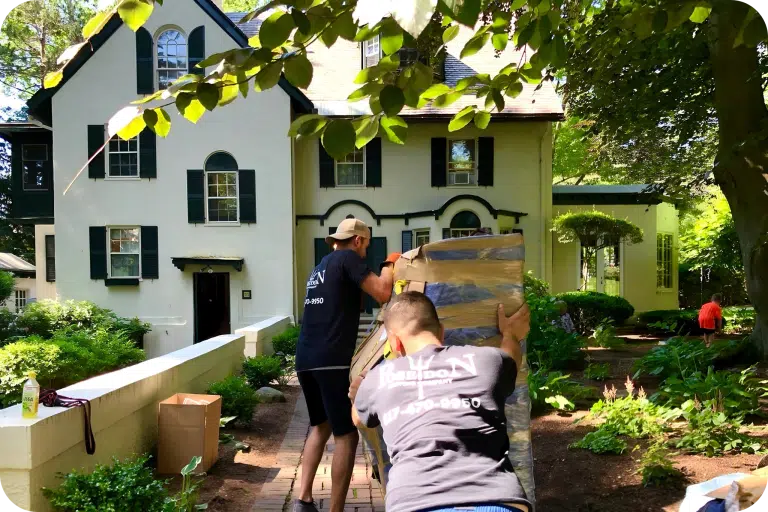
Step 4: Protect Your Deposit During the Physical Move
Here’s the part every other move-out guide skips: your apartment is at its highest risk of damage during the actual move. Furniture being carried through narrow hallways, heavy boxes dragged across hardwood floors, bed frames scraping door frames — this is when security deposit deductions happen, and it’s entirely preventable.
As professional movers, we see this every day. Here’s what actually protects your rental:
✔ Floor runners in high-traffic areas. Lay protective runners from the apartment door to the truck loading area. Hardwood floors, tile, and laminate scratch easily under the weight of loaded dollies. A professional crew brings these automatically — if you’re moving yourself, buy or rent them.
✔ Door frame protectors. Door frames are the #1 casualty during apartment moves. Couches, mattresses, and dressers clip corners and leave scuffs or gouges that landlords charge for. Professional movers use padded door jamb protectors — if you’re DIY-ing, old towels taped to the frames work in a pinch.
✔ Wrap furniture before it enters the hallway. Moving blankets and stretch wrap prevent damage to both your furniture and the walls. An unwrapped dresser carried through a narrow corridor is a scratch waiting to happen — on both sides.
✔ Use a dolly — don’t drag. Dragging heavy boxes or furniture across floors is the fastest way to create scratches and scuffs that come out of your deposit. A hand truck or four-wheel dolly (on top of a floor runner) is the safe method.
✔ Cover the elevator interior (if applicable). Many buildings require elevator padding during moves — and even if yours doesn’t, protecting the elevator walls prevents damage that could be charged back to you or delay your move if building management intervenes.
This is why hiring professionals matters for rentals. A reputable moving crew protects the building as standard practice — floor runners, door frame protectors, furniture wrapping, and careful handling are included in the service. When you’re moving out of a rental and your deposit is on the line, the cost of professional movers is often less than the deposit deductions you’d face from a DIY move gone wrong.
Step 5: Coordinate Building Access & Moving Day Logistics
If you live in a managed apartment building, condo, or high-rise, there are logistics to coordinate before the truck arrives. Missing these can delay your move, add fees, or create conflicts with your building:
✔ Reserve the elevator. Book the freight elevator (or passenger elevator if no freight is available) at least 1–2 weeks ahead. Without a reservation, you may share with residents or wait hours for access.
✔ Confirm move-out hours. Many buildings only allow moves during specific windows (e.g., 9am–5pm weekdays). Confirm the allowed hours at your building so you don’t schedule movers for a time the building won’t permit.
✔ Request a COI from your mover. Some buildings require a Certificate of Insurance from the moving company before allowing access. Ask your mover to send it directly to building management — but do this at least a week early, not the day before.
✔ Secure parking for the moving truck. In cities like Boston, you may need a street parking permit from the city. Apply at least a week out. Without it, the truck has nowhere to park — and double-parking risks tickets and delays.
✔ Tell your mover about access conditions. Stairs, long carries, narrow hallways, low-clearance garages — anything that affects how the crew gets from your unit to the truck. This prevents surprise fees and lets the crew bring the right equipment.
Step 6: Document Everything — Before and After
Documentation is your strongest protection in any deposit dispute. Take this seriously — it takes 15 minutes and can save you hundreds:
✔ Photograph every room after cleaning, before moving. Capture walls, floors, appliances, closets, and any area a landlord might inspect. Use your phone’s timestamp feature so dates are clear.
✔ Photograph every room again after the move. Once all furniture is out and the space is empty, do another round. This proves the move itself didn’t cause new damage — and if it did, you’ll have documentation of when it happened (relevant if your movers carry liability insurance).
✔ Video walkthrough. A quick video walkthrough of the entire empty apartment — narrating the condition of each room — provides stronger evidence than photos alone if a dispute goes to court.
✔ Compare to your move-in photos. If you have move-in photos or a signed condition report, compare them side by side with your move-out photos. This is your proof that pre-existing damage wasn’t caused by you.
Step 7: The Move-Out Inspection & Key Return
The move-out inspection is where your deposit is decided. Handle it right:
✔ Be present for the walkthrough. Walk through the apartment with your landlord or property manager. This is your chance to address any concerns in person, point out pre-existing issues, and agree on the condition.
✔ Ask for a written condition report. If your landlord identifies any issues, ask them to document it in writing. This creates a clear record of what (if anything) will be deducted — and gives you a chance to dispute inaccurate claims.
✔ Return all keys, remotes, fobs, and garage openers. Unreturned keys can result in lock-change charges deducted from your deposit.
✔ Provide your forwarding address in writing. Your landlord needs this to send your deposit refund. Without it, delays are on you — and in some states, the landlord’s deadline doesn’t start until they have a forwarding address.
✔ Leave utilities on until after the inspection. The landlord needs to verify that everything works — lights, outlets, HVAC, appliances, plumbing. Schedule utility shutoffs for after the walkthrough, not before.
Your Security Deposit: Know Your Rights
Security deposit laws vary by state, but the basics are similar: your landlord can only deduct for actual damage beyond normal wear and tear (and sometimes unpaid rent), and they must return your deposit within a specific timeframe. Here’s what you should know:
✔ Return deadline: Most states require the deposit back within 14–30 days after move-out. Check your state’s specific law.
✔ Itemized deductions required: If your landlord withholds any portion, they must provide a written, itemized list of deductions with documentation.
✔ Normal wear and tear is not deductible. Faded paint, minor carpet wear, small nail holes from normal picture hanging — your landlord can’t charge you for these.
✔ Dispute process: If you disagree with deductions, request written clarification first. If unresolved, small claims court is the standard next step — and your move-in/move-out photos are your strongest evidence.
Massachusetts Renters: Your Deposit Has Extra Protections
If you’re renting in Massachusetts, the security deposit law (M.G.L. c. 186, § 15B) is one of the strictest in the country:
→ Your landlord must return your deposit within 30 days after you vacate.
→ The deposit must be held in a separate, interest-bearing Massachusetts bank account — and you’re entitled to annual interest.
→ If the landlord deducts for damage, they must provide a sworn, itemized statement with receipts or cost estimates within 30 days.
→ If the landlord misses the 30-day deadline or fails to follow proper procedures, they lose the right to keep any portion — and you may be entitled to triple damages plus attorney’s fees.
→ The landlord cannot deduct for normal wear and tear — only for actual damage caused by the tenant.
The Admin Checklist: Don’t Forget These
Beyond cleaning and the physical move, there are admin tasks that need to happen around your move-out. Miss these and you’ll be dealing with issues at your new address for weeks:
✔ Set up mail forwarding through USPS (do this at least 2 weeks before your move)
✔ Schedule utility transfers or shutoffs (electric, gas, water, internet)
✔ Cancel or transfer renters insurance
✔ Update your address with your bank, employer, subscriptions, and any government agencies
✔ Pay all final bills associated with the rental (last month’s rent, outstanding balances)
✔ If moving across states, see our interstate moving guide for the full admin checklist (driver’s license, vehicle registration, voter registration, tax implications)
Make Your Rental Move-Out Stress-Free
At Poseidon Moving, we help renters move out of apartments every day — and we know that protecting the unit is just as important as protecting your belongings. Our crews use floor runners, door frame protectors, and furniture wrapping as standard practice on every apartment move. We handle local moves, long-distance relocations, professional packing, and furniture disassembly/reassembly.
Moving out of a rental soon? Request a free quote today — we’ll protect your apartment and your deposit.